

The equalizer (EQ) is a very powerful tool that is EVERYWHERE. Seriously. Open up iTunes and click on the “Window” menu. There it is. As a musician, you’re going to see some form of EQ on virtually every soundboard and amp you play through. This is fantastic, because if you spend a bit of time developing your EQ skills, you’ll suddenly be able to bring a lot more control to your sound—no matter what venue you’re playing in. This article is for new bands looking to take control of their sound and bring it to the next level. Looking to get your head around the basics? You’ve come to the right place. Welcome.
Primer: what’s an EQ anyway?
There are many different types of EQs—graphic, parametric, semi-parametric, and so on—and though they’re each used a little differently, they all do a very similar thing: an EQ makes a group of frequencies louder or quieter. For example, think of the “Bass” knob on a stereo: it’s just a simple EQ that controls the low frequencies. Getting comfortable with the idea of frequencies is a great first step in gaining control of your live sound.


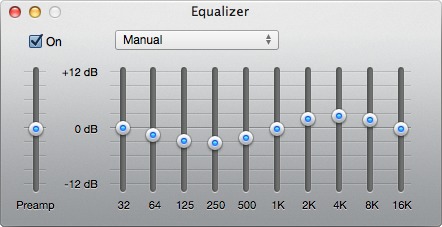
The graphic EQ in iTunes controls 10 frequency bands
Let’s take a look at the iTunes equalizer (if you have iTunes, just click “Window” and then “Equalizer”). You’ll see a 10-band EQ like the one on the right. Those numbers at the bottom of each slider are the frequencies—e.g., the slider labelled “32” controls the very low sound around 32 Hz. Our ears generally hear between around 20 Hz and 20 000 Hz (that’s 20 kHz), so this EQ has us covered!
Different frequency ranges have different qualities, different characters, different feels—and knowing this stuff is the foundation of your future EQ mastery! For example, too much volume around 1 kHz is going to sound nasal; too little 8 kHz will sound dull. Knowing this, we can just turn up or down the right sliders to fix the problem. We’ll hear some examples of this once we get to the video!
EQing the band: it’s a team sport!
Before we get into some specifics, there are two HUGE points often overlooked by beginners, and I can’t emphasize them enough:
1. Even if all instruments sound great on their own, they may not sound good together. EQing a group of musicians is about making sure they sound excellent as a unit. If you take a great sounding band and have one member play on her own, don’t be surprised if it doesn’t sound great: a bass may sound dull, a guitar or vocal may sound thin. That’s OK! All these instruments leave a bit of space in their sound so they can jigsaw together into one impressive band sound. At a show, you play together—so that’s how you should EQ too. EQing is a team sport.
2. To make one instrument sound its best, consider everyone’s settings. For example, if the bass guitar has its highs turned up loud, the guitar may not pop through. Just turning that guitar up—instead of tweaking the bass’s settings—could cause more problems.
So what do you do? A rule-of-thumb for beginning EQers is to let each instrument own a zone. In a classic four-piece (guitar, bass, vocals, drums), give the bass the lows below ~200 Hz (turn these down on the guitar and vocals), give the guitar the mids (up to roughly 1 kHz), and let the vocals pop by owning the high-mids (around 4 kHz). A simple way to cut high-mids on an electric guitar or bass is with the tone knob usually found on many electric instruments. And this can be quite a small change too — even just a 1/8 turn can do wonders.
The vocals: making them pop
To get a good vocal sound out of a basic soundboard, you can do a few simple things. (We focus on vocals here, but many of these tips will apply to all instruments.)
Turn down the lows. Women generally don’t sing much below 200 Hz; for men it’s 100 Hz. So, any sound below those frequencies that makes it into the microphone is probably not what we want. Maybe it’s the rumble of nearby traffic, or some low-frequency electrical hum. Let’s get rid of it!
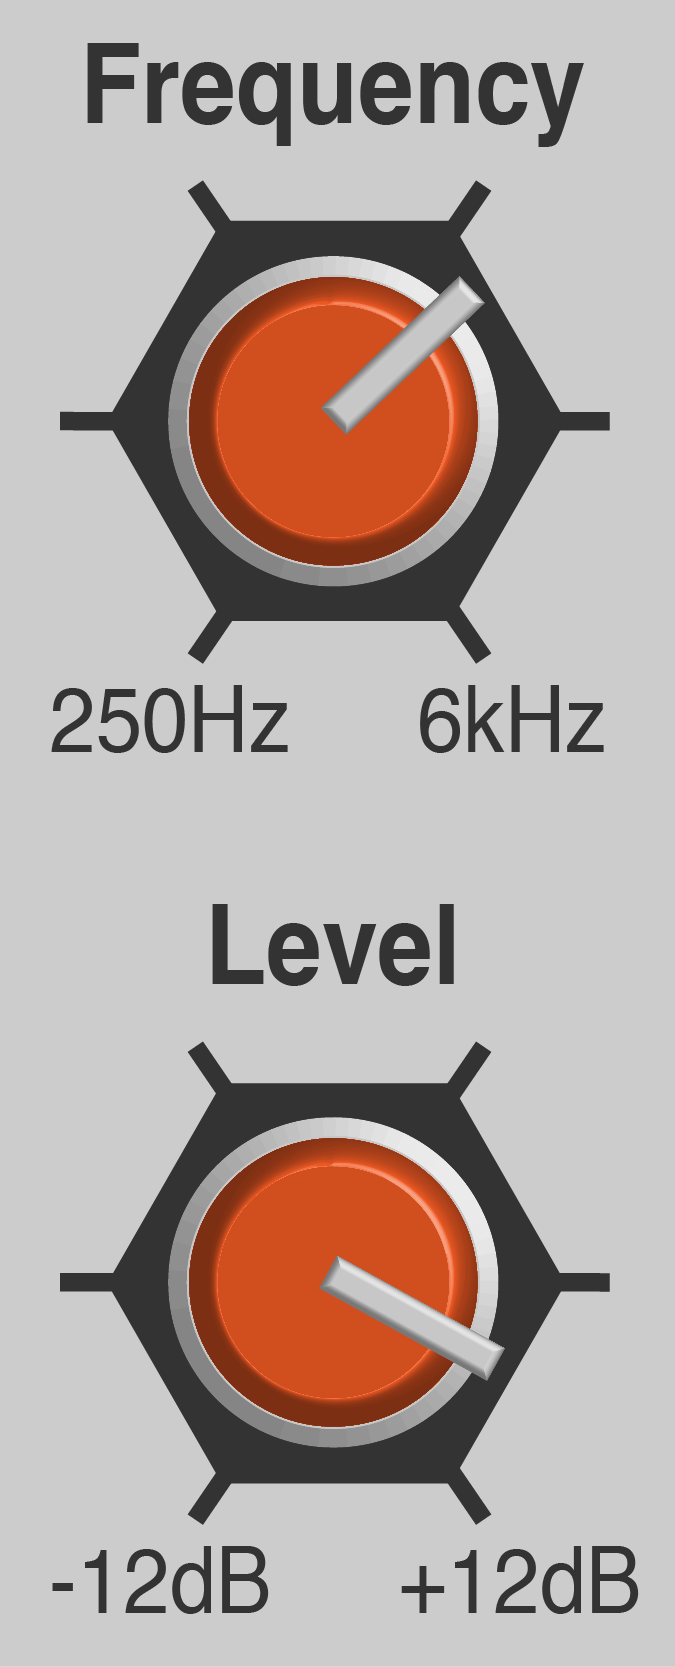
The next step depends on your equipment. You’ll likely have at least one semi-parametric EQ for the vocal track mids. (Wait, what’s a semi-parametric EQ? It’s just two knobs: one for the frequency, and one for the level.) Now listen to the vocals (with the whole band playing), and pick the problem that’s most obvious: muddiness, a nasal sound, lack of warmth, or lack of presence. Picked one? Then follow the instruction below that fits. If you have four of these semi-parametric EQs, then you can move onto the other three instructions when you’re done. If not, you’ll need to choose carefully!


A semi-parametric EQ controls the volume of sound at a specific frequency.
Turn up the presence range. Sometimes you put on a record or go to a show, and you can clearly hear everything: lead vocals, harmonies, guitar, bass, drums—it all sounds terrific. And yet, you find one particular instrument is highlighted—usually the lead vocals. While you hear everything, you find yourself listening to that one instrument above the rest. You can place an instrument at the forefront, just like this, using the presence range (around 4 kHz). For example, if you want the vocals to really pop through, turn up this range on the vocals and turn down this range on everything else. Changes of even 3 dB (that’s small) can do a great deal.
Cut the mud or increase the warmth. The muddiness/warmth region is around 250 Hz. If your vocals are muddy and the words just aren’t making it through, you may want to cut this region. On the other hand, if the vocals sound weak and need some warmth, you’ll want to raise it.
Reduce the nasal sound. The nasal region is around 1 kHz. If you find the vocals are getting too nasal, cutting this range a little can make a noticeable improvement.
Finding the frequency. Now that you know which frequency range to adjust, let’s improve that vocal sound! We’re going to assume you have a semi-parametric EQ control for mids (explained above). To start, crank the level knob most of the way high or low, depending on if you’re cutting (e.g., to reduce mud) or boosting (e.g., to increase presence). Then have the singer sing normally (not just say “Check.. 1… 2…”!), with or without the band, as you slowly turn the frequency knob around the frequency range you want to change. For example, scan from 2 kHz to 8 kHz for presence. Somewhere in that range the effect will really stand out—that’s the magic frequency, and it’s a little different for everyone. Bring the level back to something a bit more subtle, and you’re good.
Remember: when you’re EQing the vocal, your goal is to make it sound good with the band, not just on its own. Make sure you always do some EQing with everyone playing!
The caveats: EQing is great if…
Building your EQ skills can lead to a giant improvement in how your songs sound to the audience. But, just like any effect, they aren’t a fix-all: songs still need to be awesome, and the performance should still be both engaging and tight. Music comes from the heart, makes its way through your instrument and sound equipment, and connects to your audience. Knowing your effects, like EQ, makes sure it gets there in one piece! And for you vocalists, know your distance to the mic! If in doubt and you’re using the usual SM58-style microphone that you’ll find in most clubs—stay very close!
Train those ears: enter hearEQ!
Developing good EQ skills involves building both knowledge and experience—and that practical experience can be tough to get at first. That’s where hearEQ comes in. If you’re an iPhone or iPad user, you can check out the hearEQ app—a 99¢ app that teaches you about different frequency bands, and then helps you practice EQing using custom exercises—all on your very own tracks. Understanding how the different frequency ranges sound—so you can say “hey, sounds like the bass could cut the highs a little” or “vocals could be warmer, let’s boost around 300 Hz”—is a powerful skill and hearEQ helps you get there. We are super proud of this app, and we hope you find it as useful as we have. Check out our video below to learn more—it’s also got some cool EQing examples!
hearEQ: Ear training for musicians, engineers, and audio lovers from Ten Kettles on Vimeo.
Bio: Alex Andrews is an engineer (B.Sc. Engineering Physics, M.Sc. Electrical Engineering), active musician, and Founder and CEO of an app development company called Ten Kettles. After ten years working with some terrific research labs—from physics to music psychology to cochlear implants—founder Alex began Ten Kettles as a creative, productive, and thoughtful company. He is passionate about creating software and mobile applications that have a positive, meaningful impact. Based in Toronto, Canada, Ten Kettles focuses on apps for music and education. www.tenkettles.com
[hana-code-insert name=’touring-dont-miss’ /]
[Photo of soundboard from Shutterstock.]