
 [This article was written by Alex Andrews of Ten Kettles Development. Find them on Twitter at @tenkettles.]
If you’re an electric guitar player and have played a show or two, you probably know (or can guess) how much easier it is to move a smaller amp around, compared to a big stack. But many musicians might worry about the sound quality they’ll get through a smaller amp. Or, that the gig they’re playing won’t have that precious extra mic stand needed to mic it!
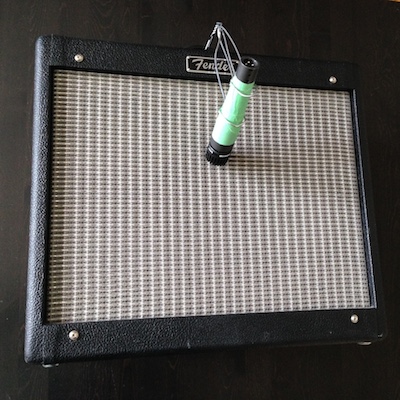
That’s where the build-it-yourself AmpHanger comes in—you can literally build a mic stand for your amp with stuff you already have around the house. I came up with the idea one day before an impromptu gig—I didn’t know what gear to expect at the venue, and wanted to be sure I had a back-up plan. The AmpHanger ended up being a great back-up solution: quick to build, very portable, and it fits popular microphones like the SM57 (pictured). All you need is a spare hanger, some pliers, tape, and you’re good to go!
But first, why use a small, miked amp instead of your giant stack?
The small, miked amp
Let’s take a look at a few advantages of this approach, and then jump into building our AmpHanger.
1. The mic: better sound at the back (and front). A venue’s speakers are usually placed well above ground level, which means a couple things:
* Anything going through those speakers (like your miked amp) shoots over the audience, tables, chairs, bar, and so on, making it out to the whole venue unobstructed.
* On the other hand, an un-miked amp at ground level will blast the audience at the front—losing much of its power in the process—leading to a sound that’s more quiet and dull at the back of the venue.
2. The amp, part 1: better tone at lower volumes. Many amps, especially tube amps, really start to sound their best at higher gain levels, but that big amp may never see those higher, sweet-sounding levels in a smaller venue. That’s another great thing about smaller amps: their optimal volume is way better suited to smaller venues. And when extra power is needed (say, for a bigger space), you just turn up the amp microphone. Done.
3. The amp, part 2: more money in your pocket. This is a big one: making money at gigs isn’t just about how much you earn—it’s about how much you don’t spend.
* With a smaller amp, you may be able to take the subway or bus to your show, instead of a cab or paying for parking/gas. If you perform a lot in your hometown, those savings will really start to add up.
* And besides being easier to lug around, a good-quality small amp is going to cost you much less than a good-quality big amp.
That said, maybe your musical style, look, or usual performance venues may be best served by that big amp, but for many musicians the small, miked amp is definitely something to consider.
AmpHanger, the video
And now the how-to video. Enjoy!
AmpHanger, step-by-step
Here’s the step-by-step guide on how to build a DIY mic stand for your amp. You’ll need a wire hanger, pliers, painter’s tape (optional), and your amp should have a handle.
1. Stretch out the hanger. Grab the bottom of the hanger with the pliers, and pull.
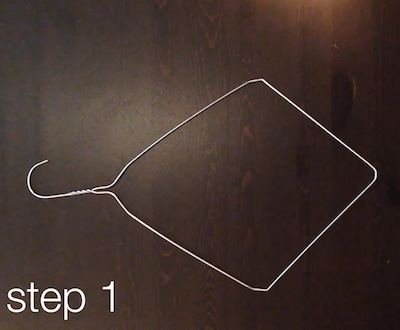
2. Fold the hanger in half from right to left, like you’re closing a book.
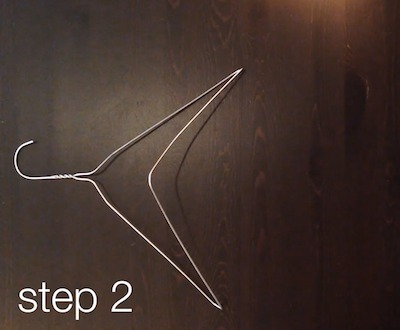
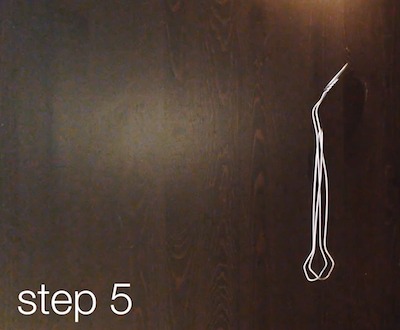
3. Bend the hook as shown. Then, squeeze the hook with the pliers so that it’s about half as wide.
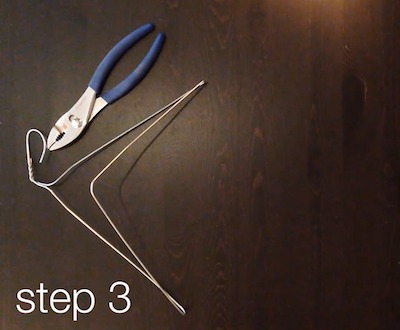
4. Pull the top loop up and over the bottom one. (This is a little tricky at first—you may need to bend the hook a bit. Check out the video above for an animation at 0:27)

5. Squeeze the left and right loops together so that they are 5–10 cm apart. Then use the pliers to shape the bottom of each loop so that they will fit a microphone nicely. Side-view shown
6. Add some scratch protection to the mic. We use painter’s tape so it doesn’t leave any gunk, but feel free to use anything you want: an old sock, a custom-knitted sleeve, etc.
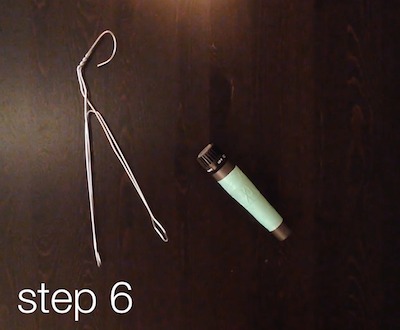
You’re done! Loop it over your amp handle and you’re ready to go.
Tone and EQ
The AmpHanger is great to keep in your guitar case for those live shows when you can’t find a spare stand. For recording, however, you may want more control over where the mic faces the amp, its distance to the amp, and the angle too. These three aspects of microphone placement—position, distance, and angle—help you refine your tone before you click record, and that’s way faster (which, in a studio, means cheaper) than having to tweak the recordings afterwards.
When we talk about tone, like how bass-y or treble-y our sound is, we are often talking about equalization, or EQ. When I’m not crafting DIY amp hangers, I create music education apps and our newest app, hearEQ, is all about developing those EQ skills. Good sound isn’t just knowing the tone you want—it’s having the skills to bring that tone out of your amp, computer, or soundboard. Want to learn more? Check out our quick EQ primer and intro to hearEQ here:
Learn more at www.hearEQ.com or on hearEQ’s App Store page
* * *
For musician readers, what’s your experience playing through small, miked amps?
For sound engineer readers, what’s your experience working with this setup at gigs?
Bio
Alex Andrews is an engineer (M.Sc. Electrical Engineering, B.Sc. Engineering Physics), active musician, and Founder and CEO of a Toronto-based music education app company called Ten Kettles. After ten years working with some terrific research labs—from physics to music psychology to cochlear implants—founder Alex began Ten Kettles as a creative, productive, and thoughtful company. He is passionate about creating software and mobile applications that have a positive, meaningful impact. He recently wrote “Make your shows shine with these simple EQ tricks,” which appeared on CDBaby’s DIY Musician blog in May 2014.
[hana-code-insert name=’newsletter-smarter-musician’ /]