
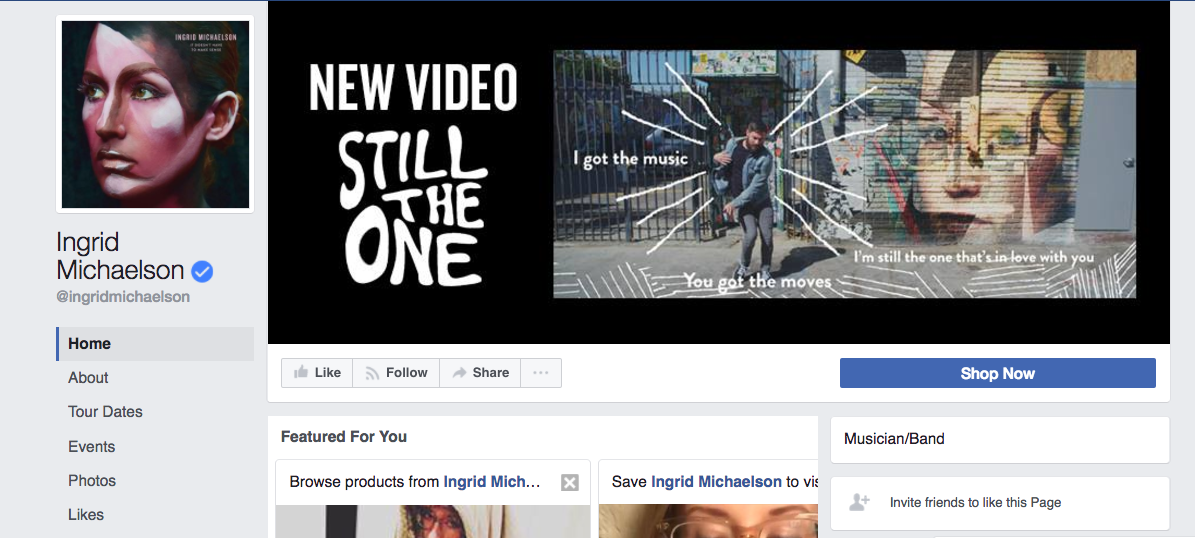
A Facebook Page gives your music a public home where fans can find your latest release, see upcoming shows, and get in touch. It also gives you tools to manage your presence with bandmates or a team, see how your posts perform, and promote a release if you decide to run ads.
You don’t need a complicated social media strategy to get started. Here’s how to set up an artist or band Page that makes it easy for people to discover your music and take the next step.
Why create a Facebook Page for your music?
A personal Facebook profile helps you stay connected with friends and family. A Page is designed for your public artist presence. People can follow your music without sending a friend request or gaining access to posts you share only with friends. A Page also gives you access to management, advertising, and performance tools that are useful as your audience grows.
For a band, there’s another practical benefit: You can give trusted people access to help manage the Page. That means a bandmate or manager can post show announcements and respond to messages without everyone sharing one password. Choose their level of access carefully; someone with full control can also change settings and manage other people’s access.
Facebook doesn’t have to be your main promotional channel to be useful. Think of your Page as one place fans, venues, and potential collaborators can check for accurate information about you. Keep it current, and decide how much time to spend there based on where your own audience engages.
What you’ll need before you start
Gather your artist or band name, a recognizable profile image, a cover photo, a short bio, and a link to your music or website. Have a public contact email ready if you want venues or press to reach you. You’ll also need to sign in to a personal Facebook account to create and manage the Page.
If you have a new single, show, or mailing list to promote, choose one destination you want visitors to reach first. You can update it when your priorities change.
How to make a Facebook Page for your band or artist project
1. Create the Page
While signed in to Facebook, go to Create a Page. Enter the name you release music under so fans can recognize you. Search the available categories and select the one that best describes your project, such as a musician or band category if Facebook offers it. Add a brief description, then follow the prompts to create your Page. Meta also offers a Page creation walkthrough.
Facebook changes its setup screens from time to time, so use the on-screen prompts if a button or field looks different. Before sharing your Page, check that the artist name and category display as intended.
2. Add photos that make your music recognizable
Use a clear artist photo or logo for the profile image. This appears beside your posts and comments, often at a small size, so choose something fans can recognize at a glance. Use the cover image to show more of your world: a current release, a live photo, or a visual that fits your music.
Preview both images on a phone and a computer. Facebook may crop them differently, so keep faces, release dates, and other important details away from the edges. You can change your cover as a campaign changes without rebuilding the Page.
3. Fill out your bio and contact details
Tell visitors what kind of music you make, where you’re based if that’s relevant, and what they should hear first. Write like yourself. A couple of specific sentences will do more work than a long list of genres.
Add your official site or music link, a public email for booking or press if you have one, and links to your other social profiles where the Page allows them. Check every destination before moving on. If you don’t have a website, a HearNow music page can bring your streaming links and social profiles together in one place.
4. Choose a username and an action button
If the option is available, claim a Page username that matches your artist name and your other social handles. A simple username makes your Page easier to share and tag. If your first choice is taken, choose a clear variation fans will associate with you.
Then add or edit the action button near the top of your Page. Choose the available option that supports your immediate goal, whether that’s sending visitors to your music, your website, or a way to contact you. If you’re releasing a single, point people to one link where they can choose their preferred listening platform. When tickets become the priority, update the button and cover image together so they tell the same story.
Open the Page as a visitor and test the button. Make sure it leads to the right destination on mobile, too.
5. Set Page access for your team
If bandmates, a manager, or someone else will help, assign access through your Page settings instead of sharing login details. Meta distinguishes between Facebook access and task access, with different permissions for publishing, messages, ads, insights, and settings. Give each person only the access they need, and revisit those permissions when your team changes.
6. Publish a few posts, then invite people in
Before you share the Page widely, give visitors something to explore. You might post an introduction to your music, a performance clip, an upcoming show, and a link to your latest release. Pin a post about your current priority if that option is available on your Page.
Once the Page feels ready, invite people who already support your music to follow it. Share the Page in your email newsletter, on your website, and anywhere you announce shows. Give people a reason to follow by telling them what they’ll find there, from local dates to behind-the-scenes updates.
How to use your Facebook Page after setup
Treat your Page as a conversation, not just an announcement board. Post the moments around a release or show: a rehearsal clip, the story behind a song, a photo from the road, and a thank-you after the set. Respond when fans comment or message you. If Facebook Events fit your live strategy, keep the show details and ticket link current.
You can use Meta Business Suite to manage posts and messages across Facebook and Instagram and review how people interact with your content. Look beyond follower counts: Which posts spark comments, bring people to your links, or help fill a room? Use what you learn to choose your next post.
Paid promotion can help with a specific goal, such as getting a new song in front of a relevant audience or selling tickets in a city you’re playing. You don’t need to buy ads to create a Page, and a Page alone doesn’t guarantee that every follower will see every post. Start with useful content and a clear destination; spend only when you know what action you want the ad to drive.
Distribute your music with CD Baby
Your Facebook Page works best when it connects fans to the music itself. Keep your artist details accurate, make the next step obvious, and update the Page when a release or show gives people something new to discover.
When you’re ready to share your next release widely, distribute your music with CD Baby and give fans a clear path from your Page to the platforms where they listen.
Chris Robley is an acclaimed singer-songwriter and award-winning poet from Maine.
His Beatlesque indie-pop and milltown Americana songs have been praised by The Associated Press, No Depression, KCRW, The LA Times, Boston Globe, NPR, American Songwriter, and others.
His poems have appeared in Poetry Magazine, Prairie Schooner, The Poetry Review, and more.
Robley has received a Maine Literary Award in Poetry, Boulevard’s Emerging Writers Prize for Poetry, and in 2016 was selected by former US-poet laureate Robert Pinsky as a finalist for the Dorset Prize.