

What are end screens on YouTube?
It’d been in beta for a while, but YouTube has finally rolled out end screens for everybody. End screens are visual overlay elements that show up on the last 15-20 seconds of your video. They’re like a mobile-ready version of annotations, but they look WAY less clunky.
End screens can help you build your viewership because they appear on both mobile and desktop devices (iOS and Android), and can be used to:
- Get your viewers to check out other videos, playlists, or channels
- Ask your viewers to subscribe to your channel
- Send traffic to an approved website
- Offer merch
- Get fans involved in a crowdfunding campaign
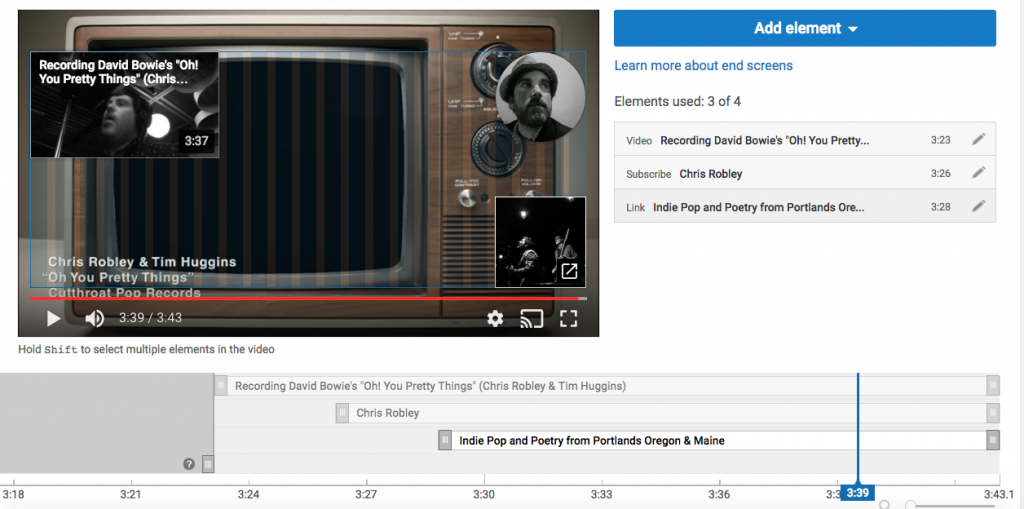
You can add up to four end screens during the last 20 seconds of your video, and each element can expand to show more info when you hover over (on desktop) or tap (on phones and tablets).
In the image I posted above you can see three different end screens appear at once. I took that screenshot just to show a few options, but I wouldn’t recommend displaying more than one at a time because they’ll compete with one another for your viewer’s attention.
You can see end screens in action during the last 20 seconds of my video here:
Any viewer who has disabled annotations will still see the end screens on your videos, BUT you won’t be able to put end screens on a video that already has annotations — so, time to choose! If you decide to add end screens you’ll be promoted to “unpublish” the annotations first (they can be republished later if you change your mind).
Here’s how to add an end screen on YouTube
YouTube offers instructions on adding your end screen.. We’ve bulked them up a bit for more clarity:
- Sign in to the your YouTube account.
- In the top right, click your account icon > Creator Studio.
- In the left menu, select Video Manager > Videos.
- For the video you want to add the end screen to, click Edit.
- In the top tab bar, click End screen.
- If the selected video contains annotations, follow the instructions to unpublish them. You can re-publish them at any time.
- You’ll see your video with the predefined grid and a timeline below that indicates the available part for the end screen. Click Add element. You can add up to four elements, and one of them must be a video or playlist.
- Choose how to build your end screen:
- Add element: You can add up to four elements to a video. At least one element must be a video or playlist. Select each element and fill in the required information, then click Create element.
- Copy from video: You can copy an end screen from another one of your videos and edit the elements.
- YouTube template: You can choose from predefined formats that show combinations of elements. You’ll need to define the content for the elements in the end screen, such as add the channel to be featured.

- Adjust the placement and size of each element on the grid. Adjust the time for the element to show in the timeline below.
- Click Save.
While you’re adding end screens you can select to preview how they’ll appear in the player, and you can go back to edit end screens at any time.
Four tips to increase the effectiveness of end screens
YouTube recommends that you:
- Feature elements that are relevant to your video.
- Encourage viewers to click by using unique calls-to-action for different end screen elements.
- Leave enough space and time at the end of the video for an end screen. Make sure you consider the video’s last 20 seconds when editing it.
- Consider timing end screen elements to appear at different times so they don’t compete with one another.
What do you think? Useful YouTube tool? Will you deactivate your old annotations? Comment below!
Chris Robley is an acclaimed singer-songwriter and award-winning poet from Maine.
His Beatlesque indie-pop and milltown Americana songs have been praised by The Associated Press, No Depression, KCRW, The LA Times, Boston Globe, NPR, American Songwriter, and others.
His poems have appeared in Poetry Magazine, Prairie Schooner, The Poetry Review, and more.
Robley has received a Maine Literary Award in Poetry, Boulevard’s Emerging Writers Prize for Poetry, and in 2016 was selected by former US-poet laureate Robert Pinsky as a finalist for the Dorset Prize.