A YouTube channel checklist for musicians
What do all successful YouTubers have in common? They create great videos.
That’s Step #1, at least.
Beyond that, you’ve probably noticed how smart video creators are using some of YouTube’s tools and features to harness the power of those videos and their intended viewers.
Is your channel optimized? Here’s a simple checklist you can reference to make sure you’re doing everything you can to boost views, build a loyal audience, and earn more money through YouTube.
A quick-start to optimizing your YouTube channel
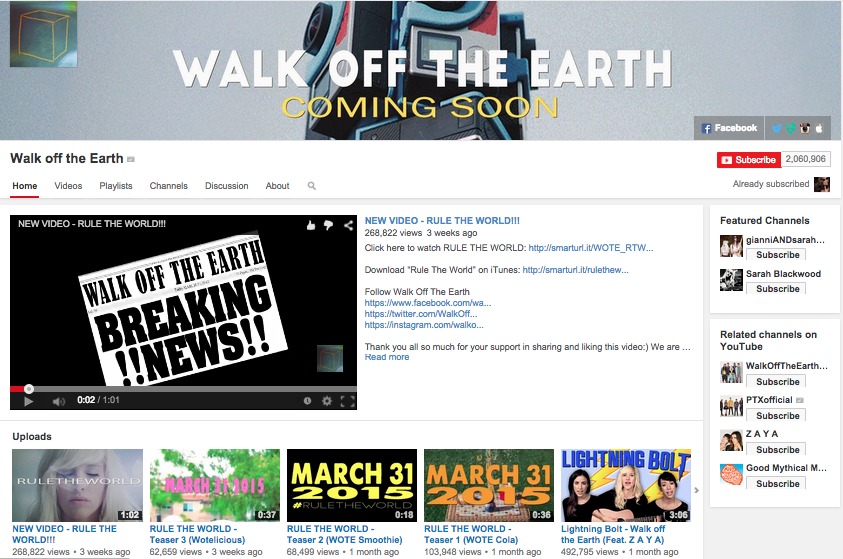
1. Choose your channel name — The channel name is different from your channel URL, so this name CAN be edited. But it’s best to pick a name and stick with it for consistent channel branding. Choose something that is short and memorable (like your band or artist name), and that also lets viewers know what to expect from your channel. Go here https://www.youtube.com/account and clik to edit on Google+.
2. Choose your channel icon — Upload a square, high-res (800×800) image that is recognizable and looks great when displayed at smaller resolutions (so use text sparingly). This image will be your channel’s icon throughout all of YouTube. If your channel is linked to G+, you can use an image you’ve previously uploaded to your G+ account. You can access this from your YouTube account page.
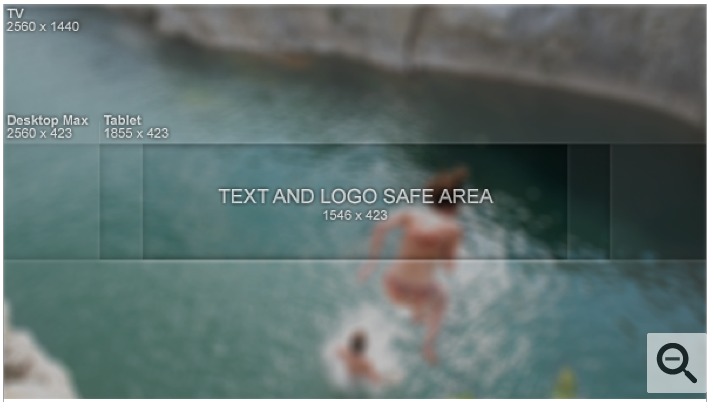
3. Upload your channel art — Channel art is the banner/header that appears towards the top of your channel when viewed on a desktop. Upload a large image (2560×1440) with the most important visual elements located in the inner 1546×423 area (so they’ll still appear when the image is scaled for mobile and tablet). See the image below for various display dimensions.
You can also use Canva to create customized art for your channel. Check out their options here.
Make sure your channel art reflects your personality and doesn’t just come off as some kind of boring brand logo. Check out YouTube’s channel art tips and template here.

4. Write a channel description — Move your cursor to the top right of the channel art section, and click “edit links.” Be sure to highlight the most important content you create, use relevant keywords, and include your upload schedule to set expectations for your audience.
5. Add website and social media links to the About tab — Corresponding icons will be displayed as overlays on your channel art. Include links to your official website, store or product page, social accounts, newsletter signup form, or promotional campaign pages.
6. Set “Featured Channels” — On the right hand side of your channel, you’ll see the “Featured Channels” header. Add any related or similar channels, including channels for other creative projects you’re involved in, your record label, etc.
7. Enable browse view and discussion — In the section of your YouTube channel homepage that contains the channel name and tab names, hover your cursor in the right-hand corner until the pencil icon appears. Click “edit channel navigation” and then enable both the browse view and discussion settings.
8. Select or upload a channel trailer — Once the browse view has been enabled, select a channel trailer video for your channel. A Channel trailer is a short video that will autoplay whenever an unsubscribed viewer visits your channel, so here’s your opportunity to get them hooked!
Your trailer should be informative and fit the overall vibe of your channel (oh, and did we mention it should be brief?). Also, you should ask viewers to subscribe. The trailer will automatically display a card at the end of the video giving viewers an easy way to subscribe.
9. Add sections to organize your channel — Sections are a great way to organize videos (by theme, style, series, genre, etc.) and give viewers an easy way to explore your content from the Home/Browse page. Sections can consist of videos, playlists, or channels, and can include your own videos as well as content uploaded by other YouTube users.
For most viewers, only your top section will be visible without scrolling — so make sure your most important videos are included in the section at the top of your channel page. Also, because sections can contain content from other channels, you have a great opportunity to cross-promote with other artists and curate an interesting viewing experience for your audience. To add a section, just click the “Add a Section” button from the bottom of your channel home page.
10. Customize your channel URL — YouTube.com/MyName is a lot easier to remember than YouTube.com/GigglyWiggly123CuzItWasMyEmailAddressBackIn2007, right? For information on how to customize your channel URL, click HERE.
Your channel must be at least 30 days old, have 500 subscribers, channel art, and a channel icon to access this feature.
Optimizing your YouTube channel with advanced features
11. Verify your YouTube channel — Go to http://www.youtube.com/account_features. If your account status has not already been verified, click “Verify” and select to verify by Voice Call or SMS.
12. Select your default video category — Go to http://www.youtube.com/account_defaults and change the category to the one that most closely reflects your type of channel, such as “music.” You can always change these manually for each video once that video has been uploaded.
13. Compose a default footer for your video descriptions — Add links to your website and social media accounts as a standard footer in your default video description field. It’ll save you lots of extra typing later on. To do so, go to http://www.youtube.com/account_defaults. Again, you can always change these manually once a video is uploaded.
14. Add tags that will apply to most of your videos — Tags help people find your video when searching on YouTube. Proper tagging can help increase monetization of your videos. Some suggested tags would include your artist name, any common misspellings, and popular keywords associated with your genre. Make sure tags with more than one word are enclosed in quotations, and don’t use commas. Avoid overly generic tags or tags that are not relevant to your video. Create your default tags here http://www.youtube.com/account_defaults.
15. Grow your fanbase with Channel Ad, aka Fan Finder — With Fan Finder, YouTube will display your channel ad to viewers (as a skippable TrueView ad) at no cost to you — giving fans of other channels the chance to discover your videos!
To get started with a Channel Ad, go to https://www.youtube.com/featured_content. Click the button that says “select your channel ad” and choose a video to feature as your Fan Finder video. For tips on what makes a great Fan Finder video, visit http://www.youtube.com/yt/fanfinder/.
16. Feature a video or playlist with Featured Content (formerly know as “InVideo programming”) — This feature allows you to highlight your most relevant content as an Annotation that appears when viewers watch your videos. To select content for InVideo programming, go to https://www.youtube.com/featured_content.
17. Add your logo as a watermark — This is another great branding opportunity, as your logo will appear in the lower right corner of your videos as a clickable link leading back to your channel page. To upload your logo, go to https://www.youtube.com/branding. The image for the watermark should be a PNG or GIF file (1MB max) and ideally have a transparent background.
18. Add keywords for your channel – Many of these keywords will be the same or similar to your default video tags. That’s ok. Use words that best describe the kind of content you are uploading to YouTube. To add keywords for your channel, go to https://www.youtube.com/advanced_settings.
19. Tell YouTube about your associated website — What’s your official website? You can help YouTube improve the quality of their search results by entering in that URL at https://www.youtube.com/advanced_settings.
Warning: it helps to have some familiarity with Google’s Webmaster tool. If you’re kinda new to all this stuff, associating your official website with your YouTube channel can be a little frustrating. But it’s worth it. So keep trying, or just find an expert and ask for help.
20. Enable channel recommendations — This will allow YouTube to recommend your channel to viewers outside of your existing audience. To do so, go to https://www.youtube.com/advanced_settings.
21. Include your Google Analytics property tracking ID — If you’re already using Analytics, you can dive deeper into traffic stats by entering your Analytics ID into your YouTube account at https://www.youtube.com/advanced_settings.
22. Allow advertisements on your videos — Go to https://www.youtube.com/advanced_settings and make sure to check the checkbox to allow ads.
23. Set your sharing preferences — Share, share, share! Go to https://www.youtube.com/account_sharing.
24. Check your privacy settings — Modest? Go to https://www.youtube.com/account_privacy.
25. Create your own compelling video thumbnail – The thumbnail is a quick snapshot that will represent your video on YouTube. In order to attract the most viewers, the thumbnail should be eye-catching. If your channel has been verified and is in good standing, you can (and should) upload your own custom image to make sure the thumbnail is as intriguing/exciting as possible. To upload your own custom thumbnail, click the “edit” button for the corresponding video in the Video Manager section of your account.
According to YouTube’s guidelines, your custom thumbnail should:
* Have a resolution of 1280×720 (with minimum width of 640 pixels).
* Be uploaded in image formats such as .JPG, .GIF, .BMP, or .PNG.
* Remain under the 2MB limit.
* Try to use a 16:9 aspect ratio as it’s the most used in YouTube players and previews.
For more info, go to https://support.google.com/youtube/answer/72431?hl=en.
—-
Alright, now that your channel is all spiffed up, you’re ready to get back to producing more awesome videos, and we can’t wait to see them. Feel free to leave links to your best music videos in the comments below.
Oh, and don’t forget that you can monetize your music across YouTube by opting into CD Baby’s Sync Licensing and YouTube Monetization Program (which is a free add-on for all CD Baby Standard and Pro releases).

